Working with Audio
All audio tracks are placed on the desktop using the Audio Track device. The following page includes more detailed instructions on how to work with these devices.
Audio in the Timeline
On the timeline, audio is organized in so called audio regions. An audio region is a continuous piece of audio which you can arrange on the timeline. The following image shows three audio regions:

From this view, you can drag the regions around and change their length. To see a more detailed view of the audio, double clikc a region to see the waveform.
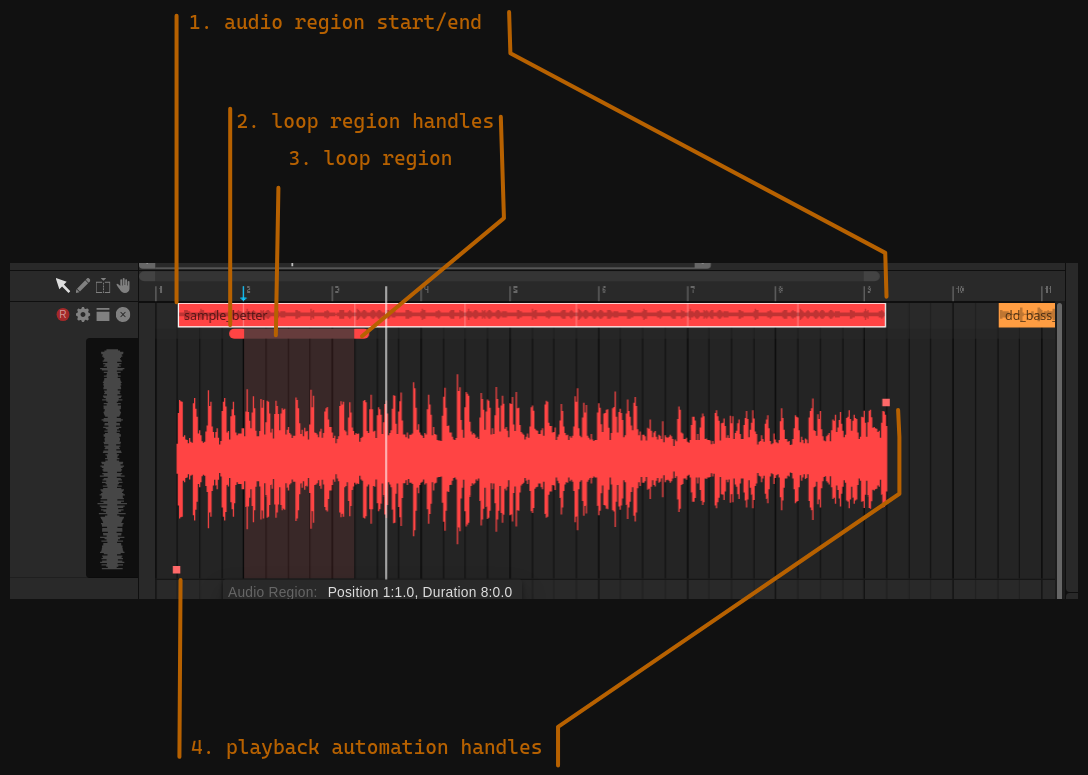
An audio region will only ever play back audio between audio region start/end. The actual sample loaded is shown as the waveform, but what’s played back of the waveform is determined by the loop region.
Whatever is marked by the loop region is played back as soon as the audio region starts, and the content of the loop region is looped until the region ends.
You can change the location of the loop region by dragging the loop region handles back and forth. To change the location of the loop region within the sample, drag on the bar between the handles.
Playback Speed Automation
Each looping sample has a bpm associated with it that is the “source bpm” of the sample. By default, the sample plays with constant speed from front to back, with a speed that makes the source bpm of the sample match the bpm of the project.
The speed of the sample is determined by the playback automation handles. By default, there is:
one at the very beginning of the sample at 0%
one at the very end at 100%
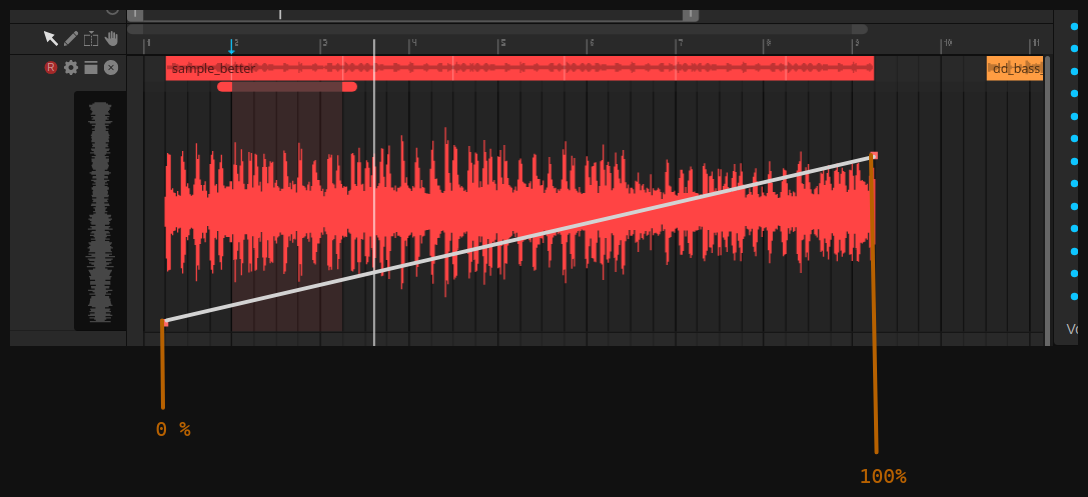
From these two handles, audiotool calculates the playback as shown in the white line below. Each position in the audio sample corresponds to the % the automation line points to. For example:
at the beginning, the automation line is at 0%; thus, the sample is at the beginning
in the center (at half of the region), the automation is at 50%; thus, the sample has has played 50% of its content at half the duration
at the end, the automation is at 100%, and the sample has finished
If, for example, you create a new automation handle by double clicking anywhere in the sample, and then drag the automation handle around, you can see the waveform changing as the speed of the sample changes in various parts of the sample.
For example, let’s consider the following change in playback speed. In this image, we created a new automation handle by double clicking anywhere in the sample, then dragging the handle to the location shown in the image:
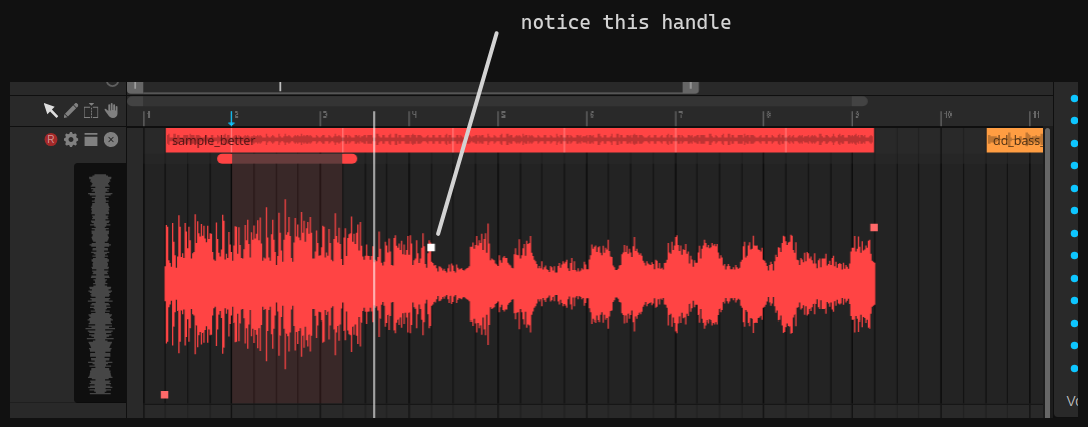
As you can see, the waveform was pushed together right until the first handle; after the first handle, the waveform was pulled apart. This is because now, the sample is played back from 0% to about 80% between the 1st and 2bd handle (making the playback way faster), and the remaining 20% are played back between the 2nd and 3rd handle (making the playback wa slower). Here’s the automation line drawn over the audio sample:
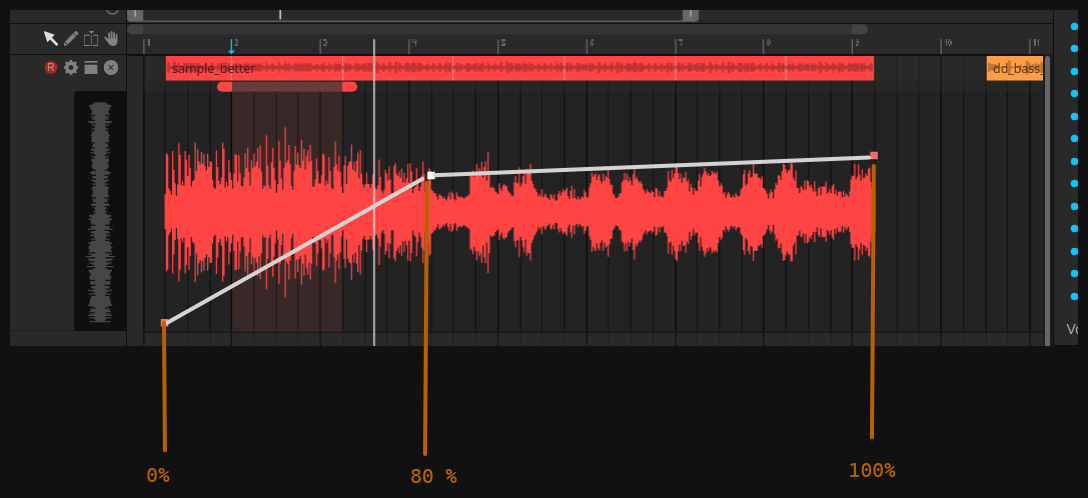
If you only drag the handle horizontally, you only change the playback speed of the sample before/after the handle; you won’t change where the handle points to in the original handle. This is how you can move e.g. the location where a kick drum is played in time.
Playback mode
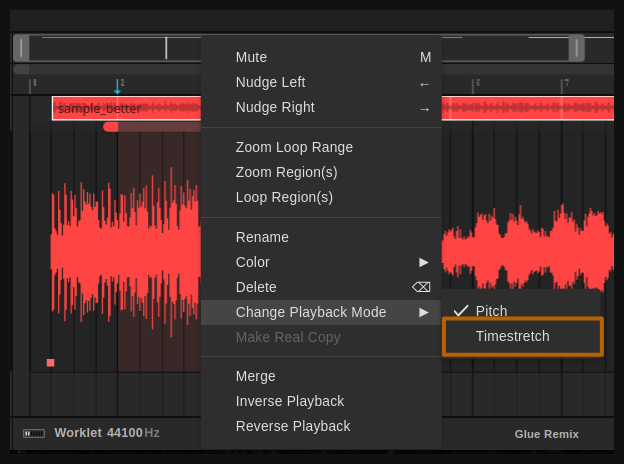
As you play back the sample like this, you will notice that the pitch of the sample changes with the speed of the playback. This is because the sample is set to playback mode “pitch”. To make the sample have constant pitch even as the speed of playback changes, you can right click the region, then click “Change Playback Mode” -> “Timestretch”:
Live recording a new sample
If you want to play an instrument or sing onto your audiotool track, this feature is for you. Audio Live Recording relaxes [1] the 30 sec upload limit and calibrates your audio system to record your instrument or voice in perfect sync with your track.
Overview
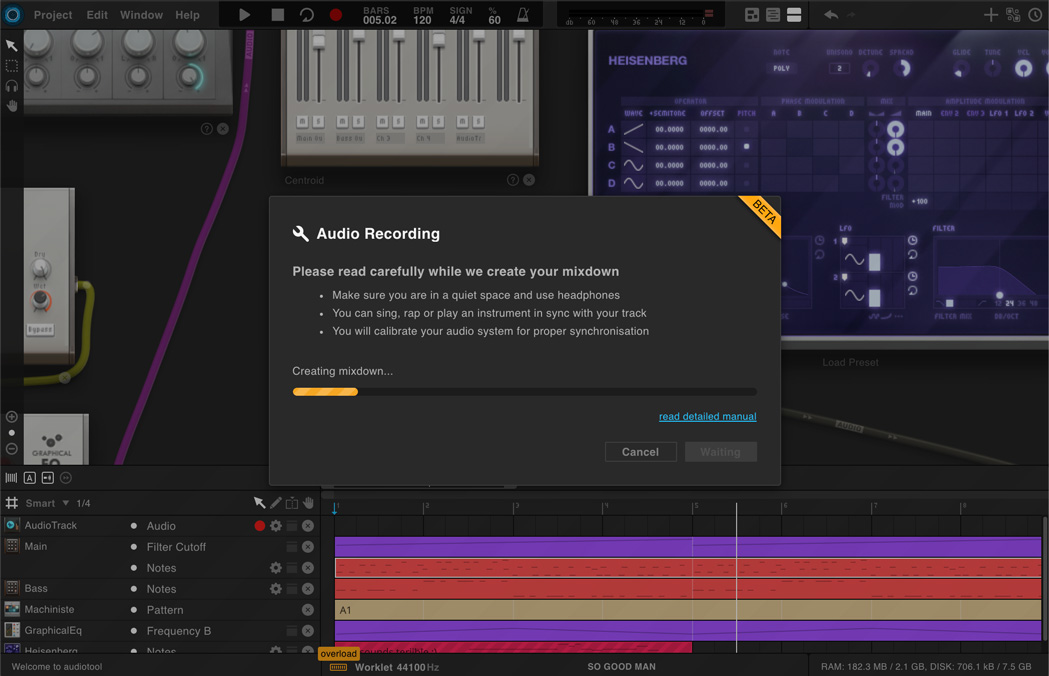
Audiotool is, to nobody’s surprise, a browser application and those are unfortunately inherently bad in handling real time audio. To get this working we introduce two workarounds: We create a mix-down of your track to reduce glitches during playback. Then we calibrate your audio system, meaning we measure the elapsed time between generating and receiving audio (latency). This round trip time later helps to place your recording in perfect sync to your track. For this you need to take some time and patience to setup your equipment.
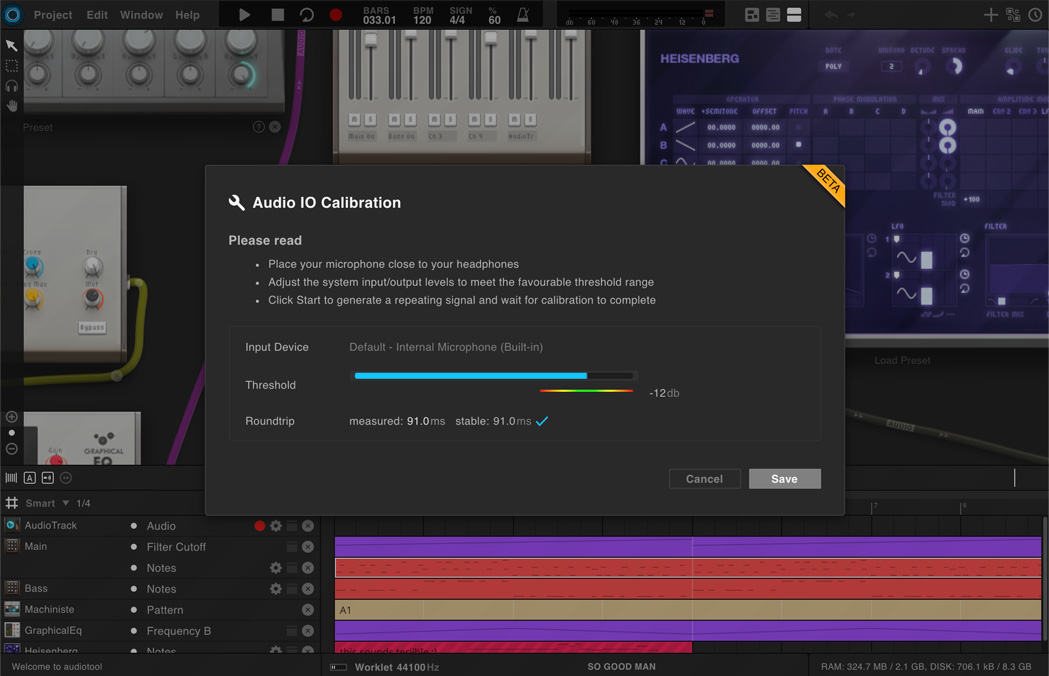
After the mix-down is created you can advance to the calibration dialog. Just follow the instructions to the letter. Once the latency has been measured, it is kept for the entire audiotool session. However, switching your audio-setup or browser tab can change that value. We encourage you to calibrate your system before each recording to be sure.
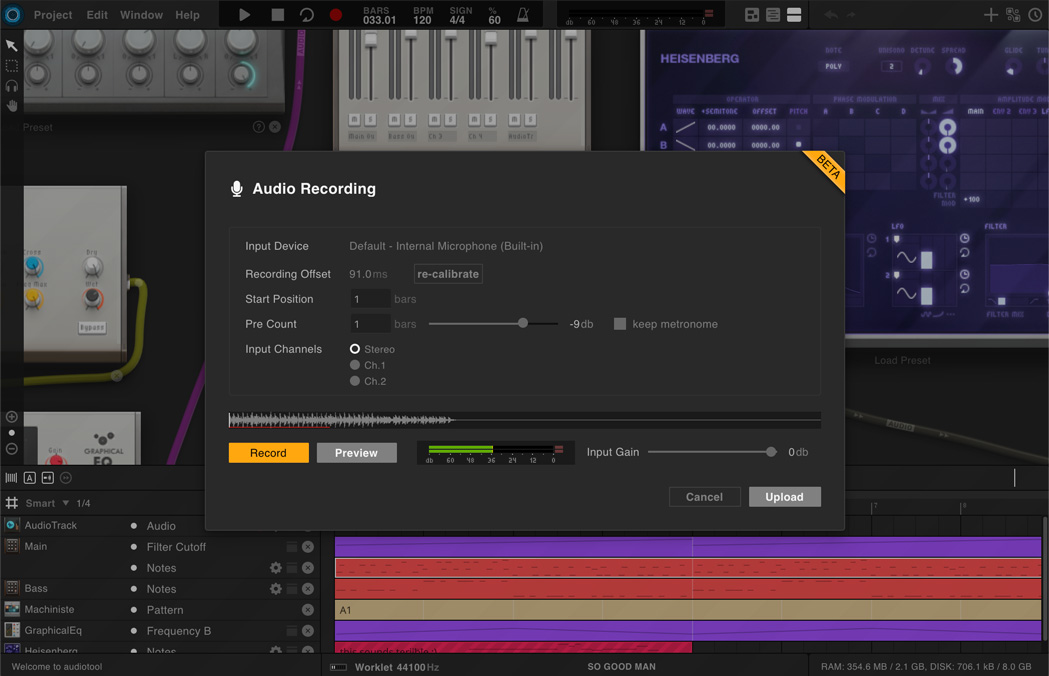
You can adjust the start position of the recording, change the pre-count settings and the input channel(s). Click Record to start and to stop recording. You can then preview your recording, discard or upload it through Probe. Please be aware that there is no echo or noise cancellation. Wearing headphones is mandatory.
Instructions
Step 1
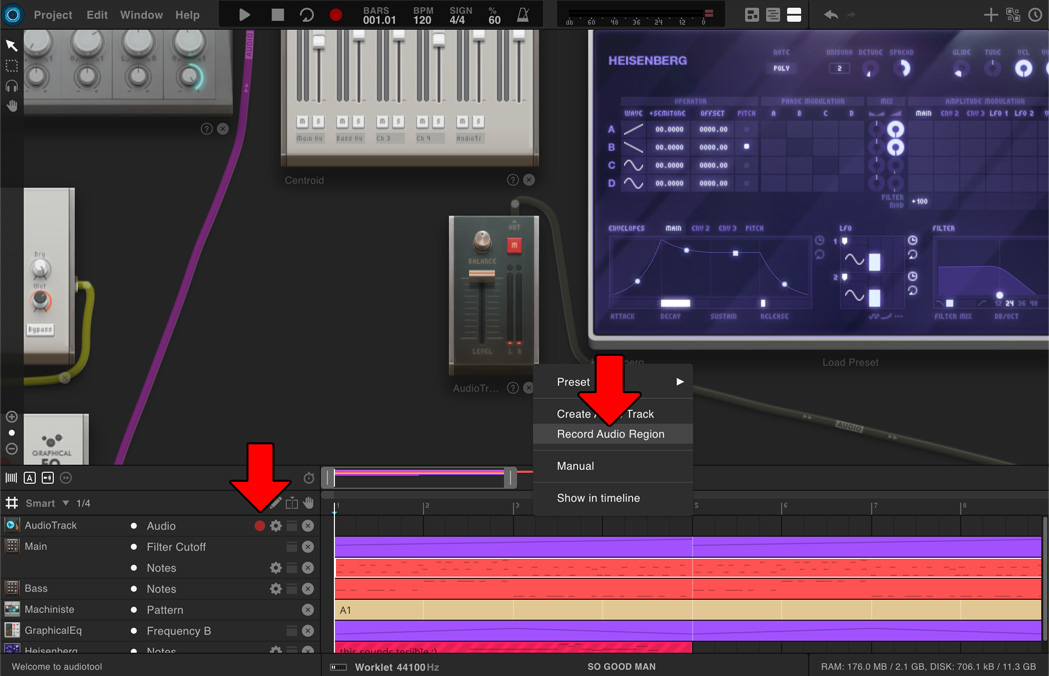
Create or use an existing audio-track device. Use either the red record button in the track header or the corresponding item in the context menu to start the recording function.
Step 2
Wait for the mix-down to complete.
Step 3
Calibrate your audio system. For best results make sure to adjust the volume of your microphone and headphones so that the sound peaks into the green area. Once you get the same time value twice, we assume that we’ve measured your system’s latency and you can advance.
Step 4
Record your audio. After clicking Stop you can preview your recording, upload or record again.
Step 5
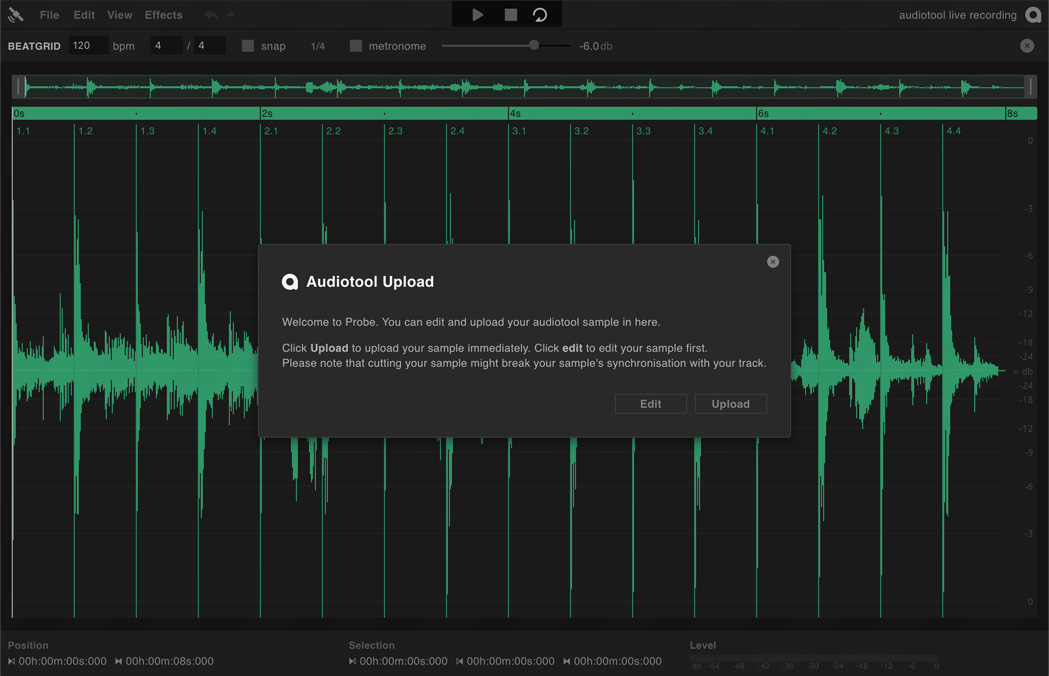
If you click the Upload button, your recording will be sent to our sample editor Probe for further processing.
Step 6
Your audio recording is automatically placed in the timeline after upload. You are done!
The sample browser
For a quick overview watch this video: The Sample Library
Uploading your own sample
For a quick overview watch this video: Upload Samples
Footnotes